
Originally Posted 6/7/12
While visiting with a client this week, I was asked how a comment can be placed on a Microsoft Dynamics GP AP check. Apparently this client needs to occasionally, for a few specific vendors, put information on the comment or memo field of the check itself.
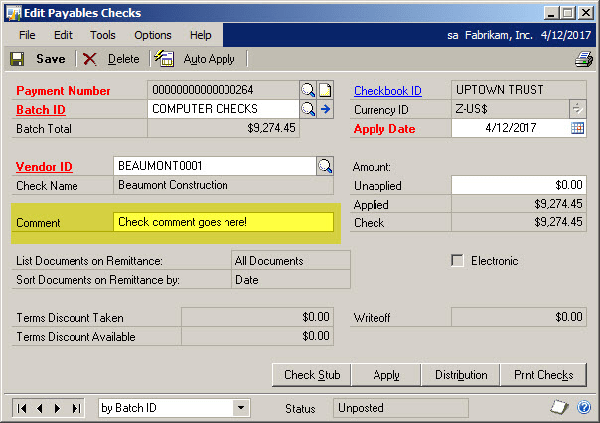
I’ll show you how to do that today. We are in the purchasing series, and under transactions, we’re going to select who we pay by choosing “edit payables check.”
- I’ll create a batch.
- I will choose my checkbook.
- Save my batch.
- I’ll pull up the vendor.
- Make it a $50.00 prepayment (or select the invoices you want to pay by using the apply window).
- Enter the comment on the “Comment” line (highlighted in yellow).
- Save entry.
If you want, you can add other checks to this batch as well. Print the checks and the comment will display right on the check itself.
But there is a little more to it than that.
It does have to be on the format of the check itself. Out-of-the-box GP does not come with that comment field. So you’ll need to work with your GP partner or someone in your IT department to add that comment field.
If you are already comfortable with Report Writer, I’ll show what that field is and where to add it. But I want to caution you: I’m going to make the Report Writer look a whole lot easier than it really is.
Launch the Report Writer by printing the check to the screen and clicking “Modify Report” right on the screen. Not only does this open the Report Writer, but it opens the correct report (check for modification) as well.
You’ll notice the field is “Comment1” and is located in the PM Payment Work File. I drag it right below the address on the check stub itself. Please note: The screenshot here is of the Check with Stub on Top, so if you are using another format, like Check with Stub on Top and Bottom, your layout will look slightly different. Just make sure you place it below the Vendor Check Name and address.
After placing the field on the check, double click on it to see the Report Field Options window. Make sure the Display Type is “Last Occurrence.”
You’ll need to set up security for this modified report, and then it’ll be ready for the users to print checks.
Let’s test the modification:
- Open the “Post Check” window in Purchasing Transactions. Since we opened Report Writer from Screen Output, our initial check is waiting to be Posted, Reprinted or Voided.
- Pull up the batch we used to open the Report Writer.
- Change the Process to Reprint Checks and click Process.
- Print the check to the screen and verify that the memo prints correctly.
I always like to test check modification by printing four checks. This helps me ensure that the overall alignment has not changed in error. Also, if the check has already been modified, make a backup of your Reports.dic file BEFORE making any changes to the check. You can back up the Reports.dic file, or export your entire modifications to a *.package file. This can be done by opening the Customization Maintenance Window, clicking on the modification(s) you want to export and then clicking Export. Either method will give you the opportunity to restore the check to the format it was before you started. I would suggest you backup using both methods on a regular basis, just to protect yourself.
Note there are 2 parts:
- We put the comment on the edit Check Window.
- We need to put the comment on the check itself in Report Writer (grant security to that modified report.)
I hope this helps!
